How to lay out and cut stair stringers, step by step
Stair stringers look intimidating, but the layout is just one rectangle repeated down a board. The part that decides whether your stairs are comfortable and pass inspection is the math you do before marking anything — and that starts with a careful measurement of the total rise. New to the words? Lumber and stair terms explained.
Tools and materials
- Framing square and a pair of stair gauges
- Tape measure, level and a straight board long enough to span from the top landing
- Circular saw plus a handsaw or jigsaw to finish the cuts
- Stringer stock — 2×12 lumber (the minimum for deck stairs in DCA 6), pressure-treated for outdoor stairs
- Hardware to attach the top of the stringers: sloped joist hangers, or a hanger board — a strip of plywood or 2× lumber fastened below the deck rim or floor header that the stringer tops are screwed to
Step 1: Measure the total rise
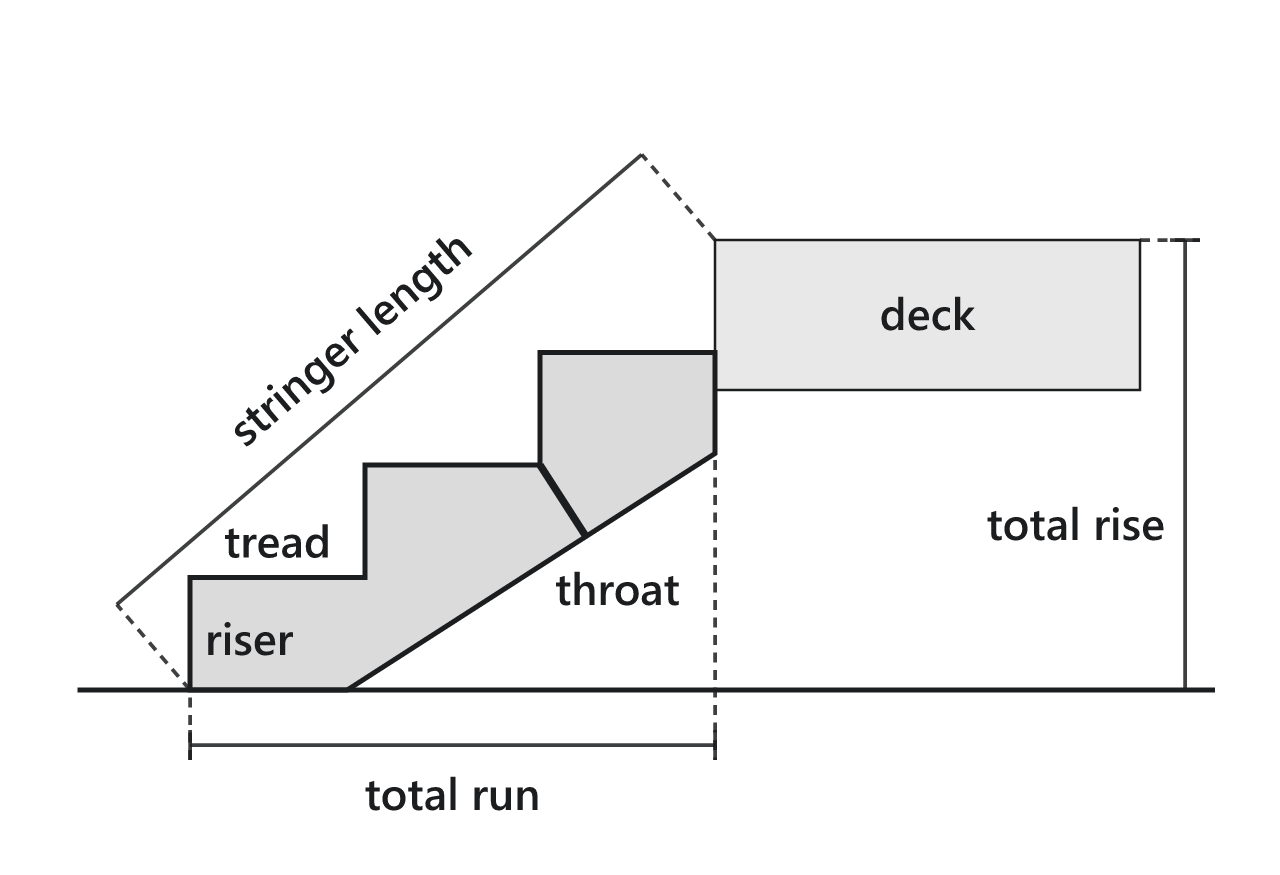
Total rise is the vertical distance from the finished surface at the bottom to the finished surface at the top. On a deck, rest a long straight board on the deck surface, extend it out over the landing spot, level it, and measure down to the ground or pad where the bottom step will land. On sloping ground this can differ from the height at the house by several inches.
Inside a house, measure from finished floor to finished floor. If flooring is not installed yet, add its thickness at the top and the bottom as needed.
Step 2: Work out risers and treads
Divide the total rise by your maximum riser height and round up to get the number of risers. Then divide the total rise by that number to get the exact riser height. The number of treads is one fewer than risers, because the top landing is the last step.
risers = total rise ÷ maximum riser, rounded up
riser height = total rise ÷ risers
treads = risers − 1
total run = treads × tread depth
Example: 44 in of total rise with a 7¾ in maximum. 44 ÷ 7.75 = 5.68, so 6 risers of 7⅓ in (about 7-5/16 in) and 5 treads. At 10½ in per tread the stairs run 52½ in out from the deck.
CalculatorStair Stringer Calculator →Enter your total rise to get risers, treads, run and stringer length.Worked examples by height
The same arithmetic gives very different stairs depending on the height, and each height has its own trap. These pages run the numbers for the most common rises:
- How many steps for a 2 ft deck — 24 in is where people try three 8 in steps; the limit forces four 6 in risers, which already need a handrail.
- How many steps for a 30 in deck — four risers of exactly 7½ in, at the exact height where deck guards start.
- How many steps for a 3 ft deck — five risers of about 7-3/16 in; the deck needs a guard, but on level ground the treads stay under the 30 in guard trigger.
- How many steps for a 4 ft deck — seven risers, and the upper treads are high enough that the stair itself needs a guard.
- Stair stringers for an 8 ft rise — a basement flight of thirteen risers that needs a full 10 ft of floor.
- Stair stringers for a 9 ft rise — fourteen risers within 1/16 in of the maximum, so measuring errors matter.
- Stair stringers for a 10 ft rise — sixteen even 7½ in risers and stringers long enough to be hard to buy.
- Stair stringers for a 2.7 m rise — the metric version, with 180 mm risers and 260 mm goings.
Step 3: Check against code and comfort
| Item | 2021 IRC residential value |
|---|---|
| Maximum riser | 7¾ in (R311.7.5.1) |
| Minimum tread depth | 10 in (R311.7.5.2) |
| Nosing | ¾–1¼ in projection; not required where treads are at least 11 in deep (R311.7.5.3) |
| Largest vs smallest riser or tread in a flight | No more than ⅜ in difference (R311.7.5.1, R311.7.5.2) |
| Width | 36 in minimum (R311.7.1) |
| Headroom | 6 ft 8 in minimum (R311.7.2) |
| Rise of one flight | 12 ft 7 in maximum between floor levels or landings (R311.7.3) |
| Handrail | At least one side of each flight with four or more risers; 34–38 in high (R311.7.8) |
| Guard on the open side of a stair | Where treads are more than 30 in above the grade (the ground or floor) below; at least 34 in high from the nosing line, openings under a 4-3/8 in sphere (R312.1) |
For comfort, a classic rule of thumb is that 2 × riser + tread should come out at about 24–25 in, and many builders treat anything from 24 to 26 in as comfortable — the range the calculator flags. A 7¼ in riser with a 10½ in tread gives 25 in; very shallow risers need deeper treads to feel natural. It is a comfort guide, not a code rule.
The ⅜ in variation rule is easy to break without noticing. Risers are only equal if the total rise you measured is the total rise you build. A landing pad poured an inch lower than planned, or a thicker floor finish at the top, changes only the first or last riser — and if that one ends up more than ⅜ in off the others, the flight fails even though every riser you cut was identical.
Step 4: Mark the first stringer
- Clamp one stair gauge to the tongue (narrow leg) of the framing square at the riser height and the other to the blade (wide leg) at the tread depth.
- Lay the square on the 2×12 near one end, with both gauges against the top edge of the board. Trace along the outside of the square to mark the first riser and tread.
- Slide the square along until the gauge touches the end of the previous tread line, and mark the next one. Repeat for every step.
- At the top, extend the last riser line to mark the plumb cut — the cut that will stand vertical where the stringer meets the deck rim or, indoors, the header (the framing across the end of the stair opening). Mark any notch needed for a ledger or hanger board.
- At the bottom, draw a line square to the first riser to mark the level cut — the cut that will lie flat where the stringer bears.
Step 5: Drop the stringer
This is the step people forget. The treads sit on top of the stringer, so if you cut the stringer as laid out, the bottom step will be taller than the rest by the thickness of a tread and the top step shorter. Fix it by cutting the tread thickness, minus any finish floor still to go down at the bottom, off the bottom of the stringer. Outdoors, with nothing added at the bottom, that is about 1 in for 5/4 decking treads and 1½ in for 2× treads. Indoors, if ¾ in flooring will go down at the foot of the stair after the stringers are in, 1½ in treads mean trimming only ¾ in.
The same logic sets the top. Lay the stringer out on the subfloor you have now, and the level cut of the top notch sits one riser plus one tread thickness, minus any finish floor still to go on the upper floor, below the upper subfloor (on a deck, below the decking surface). The calculator’s More options take both finish floors and give the drop and the top cut.
Step 6: Cut and test
- Cut along the lines with a circular saw, stopping at the inside corners. Do not overcut past the corner — it weakens the stringer at its narrowest point.
- Finish each notch with a handsaw or jigsaw held vertical.
- Hold the stringer in place, check the treads are level and the top meets the landing correctly, and adjust before cutting the rest.
- Use the first stringer as a template for the others. Trace it, then check each copy against the original.
Spacing, throat and support
The wood left below the notches — the throat — carries the load. The American Wood Council’s prescriptive deck guide (DCA 6), which many building departments accept for decks, sets the numbers for deck stairs: 2×12 stringers with at least 5 in of wood below the notches, and no more than 6 ft of horizontal span for a cut stringer (Figure 28). Past 6 ft, add a 4×4 post on a footing under the stringer, or a landing. It also calls for at least three cut stringers, no more than 18 in apart on center (Figure 29), and an intermediate landing on any stair more than 12 ft tall. Composite treads often need closer spacing — 12 in is common — so check the tread maker’s span table as well.
What the bottom of deck stringers sits on
At the bottom, DCA 6 does not allow stringers to bear on pads or patios that aren’t founded below frost depth; bear them on posts or footings (Fig. 34). Its detail fastens a 2×4 bearing block to 4×4 posts that stand on footings at least 12 in below the undisturbed grade (ground surface) or below the frost line, whichever is deeper. At the top, the stringers need a positive connection to the deck frame or floor framing — sloped joist hangers (DCA 6 Figure 31) or a hanger board — rather than toenails.
Indoors there is no frost to worry about: the bottom of the stringers usually bears on the finished floor or a slab, and the top hangs from the floor header with hangers or a hanger board. The same rule applies to both: the stringers carry everyone who climbs them, so they need solid bearing at the bottom and a positive connection at the top — follow your plans and local code.
Handrails and guards
Plan the rail before you cut, because it decides where posts go. Once a flight has four risers, the IRC wants a handrail on at least one side, 34–38 in above the nosings. Guards are a separate requirement: they apply where a walking surface — a deck or the upper treads of a stair — is more than 30 in above the grade (the ground or floor) below. On a deck the guard is at least 36 in high; on the open side of a stair it is at least 34 in, measured from the nosing line, and a 4-3/8 in sphere must not pass through it. Balusters on the level deck railing follow the tighter 4 in sphere rule.
- Framing squareBudget price
The tool for laying out stair stringers and rafters: rise on one leg, run on the other.
See options on Amazon (opens in a new tab) - Stair gaugesBudget price
Small brass or steel buttons that clamp to a framing square so every rise and run you mark is identical.
See options on Amazon (opens in a new tab) - Circular saw (7¼ in)Mid-range price
The most versatile first power saw: crosscuts framing lumber, rips boards and, with a straightedge, breaks down plywood sheets.
See options on Amazon (opens in a new tab) - Japanese pull sawBudget price
Cuts on the pull stroke with a thin kerf. Good for joinery, flush-trimming and cuts where a power saw is overkill.
See options on Amazon (opens in a new tab)
As an Amazon Associate we earn from qualifying purchases. Links to products are affiliate links — they cost you nothing extra and help keep these calculators free.
Frequently asked questions
What lumber is used for stair stringers?
Usually 2×12s, pressure-treated for outdoor stairs — DCA 6 makes 2×12 the minimum for deck stairs. A 2×12 leaves the 5 in of wood below the notches that DCA 6 asks for at typical riser and tread sizes; narrower boards generally do not.
How many stringers do I need?
At least three. DCA 6 calls for a minimum of three cut stringers, no more than 18 in apart on center, so a 36 in wide stair takes three at 18 in spacing or four at 16 in. Composite treads often need closer spacing — follow the tread manufacturer and your local code.
Why is my bottom step taller than the others?
The stringer was probably not dropped. Cut the tread thickness — minus any finish flooring still to go down at the bottom — off the bottom of the stringer so every step ends up the same height.
Do stair gauges work for both deck and interior stringers?
Yes. The gauges only hold the riser height and tread depth on the framing square, so the marking method is the same for a three-step deck stair and a full-storey flight — only the number of repeats changes.
Sources
- International Code Council, 2021 International Residential Code, Chapter 3 Building Planning (opens in a new tab) — R311.7 stairways (R311.7.1 width, R311.7.2 headroom, R311.7.3 rise of a flight, R311.7.5 risers, treads and nosings, R311.7.8 handrails) and R312 guards
- American Wood Council, DCA 6 Prescriptive Residential Wood Deck Construction Guide (2015 IRC edition) (opens in a new tab) — Stair requirements: 2×12 minimum stringers, 5 in below the notches and 6 ft 0 in maximum span for cut stringers (Figure 28), at least three cut stringers at 18 in maximum spacing (Figure 29), sloped hangers at the top (Figure 31), stringers bearing on a block fastened to posts on footings, not on pads or patios above frost depth (Figure 34), and a landing where the total rise exceeds 12 ft